Now unfortunatly I am not at home and could not do real hybrid crafting as I only have my computer available.
That is reason one.
When I only have my computer to play with I can plan with my digital kits. Try out lots of options before finalising design without wasting a scrap of paper. Then create the actual card with my real supplies.
Plus when the real papers are no longer available I still have them to print.
I have created a card front and matching wrapping paper to show why having both the real supplies and the digital supplies enables you to be even more creative
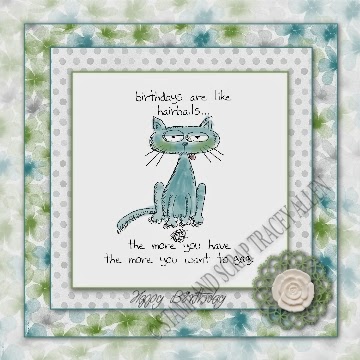
So starting with the planning I tried out loads of colourways, papers , border depths , before finalising my design. I plan to print off all the background layers . Then stamp and watercolour the top layer. The The papers I used were the Watercolor wonder papers , which I adore but are now retired , but as I have the digital ones I can still use them. The middle paper was in the real "Watercolor wonder" DSP pack although I decided to rescale (just because I could) but then I used another piece and altered the transparency for the back piece. Which I think goes very well.
Now you may ask why do we need the real stamps and paper. Well in relation to the stamps its really easy, there are loads of techniques that you can do with the real stamps that you can't do with digital stamps. Stamping and embossing . you can get special paper that you can do this with , but then you are limited to that paper, and there are techniques you can't do with that paper.
As yet I have not heard of anyone using angelina fibers with a digital stamp, or pressing it into uTEE etc. So I always have to have the real stamp. But then why have the digital.

If you have the digital stamp you have options to change the image. make it smaller , larger , thinner, fatter. So you can create your own matching backgrounds, wrapping paper , tags. I even make my own tissue tape to match the stamps. All you need is a printer (inkjet) a peice of freezer paper, or the backing sheet from a sheet of labels , tissue paper and some different widths of old fashioned double sided tape.
1st you decide what size your tissue tape will be . You need to have doublesided tape the same width.
then you design your tissue tape. You can make tissue tape as long as your tissue paper. You will need to have more freezer paper sheets. Using doublesided tape you put them together to make a sheet as long as you need, making sure that you get tape right up to the edges. You will also need a clear space by your printer the same size.
You will have to create a custom file that length in your design softwear but, you can print lots of different tapes side by side to the width of your paper.

If any of your tape designs have words in them you will need to mirror that design.
Then you lay out your sheet of tissue on a flat surface near your computer. Print onto the shiny side of the freezer paper and then lay this on top of your tissue , hold steady with one hand while pressing all over with the other. Remove freezer paper. Turn tissue over apply doublesided tape in line with your printed tape. Trim along the edges of the tape.
So thats why I have the digital and the real stamps and papers.
Products used
 |  |  |
Table built using Product Table Builder by The Crafty Owl - Independent Stampin' Up! Demonstrator.
So bye for nowTracey